We sell a variety of speciality mannequins and torsos so you can achieve the ghost mannequin effect for product photography. And we get a lot of questions from customers about how to do it.
 That is kinda like asking the car salesman a question on how to repair your car. That is a different skill set. We sell mannequins for photography purposes, but we aren’t photographers. However we can refer you to someone who is.
And we found this fantastic article online that we’ve reprinted below which provides step by step instructions on how to create it the ghost effect – 3D version.
The article was written by a company called Remove the Background. They provide image editing solutions for over 5,000 online stores.
Learn how to select models or mannequins and shoot images in order to create a ghost mannequin effect in your product photos.
One of the most common ways to photograph apparel is by utilizing models or mannequins to showcase the unique shape and fit of each product. However, it isn’t always effective to actually show the model or mannequin in every image. Retailers sometimes opt to photograph their products being modelled and remove the models and mannequins later in Photoshop.
For small retailers who do the majority of their image editing themselves, removing models and mannequins can be a difficult technique to master. Here, we provide a simple start-to-finish guide about how to take care of the necessary prep-work in order to create a successful “ghost mannequin effect” later in post.
1. Selecting and Posing a Mannequin or Model
Static ghost mannequin image

Live model movement image
In order to create the “ghost mannequin” illusion, you will need to first photograph your product being worn by a model or a mannequin from multiple angles. The plus side to this is that you will be able to use these images in your product galleries alongside any “ghost” images that you create.
If you decide to use a real model, make sure to use a static pose, as shown above. Additionally, your model should be styled minimally, and long hair should be tied up so that it does not obstruct viewing of the product. These details will make image editing much easier.
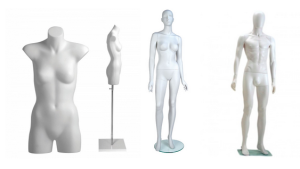
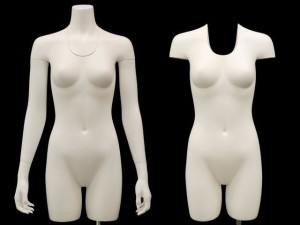
There is a wide variety of mannequins to choose from
The best mannequins are lifelike and static, as shown above. Depending on your needs, you may choose to purchase a mannequin with or without arms, hands, or legs. If your mannequin does have arms and hands, then make sure that the limbs can be positioned out of the frame. White matte mannequins tend to be non-reflective and can be made to blend into white backgrounds, which will make editing the mannequin out of the image a much easier task.
Make sure that your product fits your mannequin or model by using the right size or tailoring the garment to fit correctly. Also, if your product has sleeves, then make sure to position the sleeves downward so that the viewer can’t see down them.
2. Photographing the product
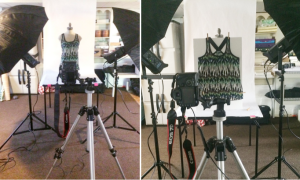
Both of these studio setups require two studio lights and umbrellas.
In order to execute the ghost mannequin technique, you need to be able to create high quality photographs in a studio setting. The lower the quality of your photographs, the less appeal the ghost mannequin effect will be able to add to those images. Camera and lighting techniques, equipment, and placement all come into play here, depending on each particular product that you’re shooting.
Read here to learn about how to use your DSLR camera’s settings to capture great product images.
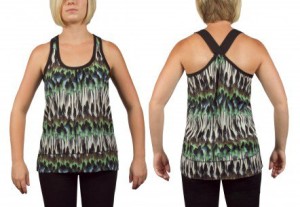
When photographing shirts, it’s important to position the camera to be directly level with the chest area, whereas the camera should be positioned across from the hip area to photograph bottoms. Photographing a product from an angle that is either too high or too low may cause the garment to look “tapered” or inaccurate.
Below are two example photographs of a tank top being worn by a mannequin. The first image was taken below chest-height, resulting in an unappealing view of the product; the second image was taken at chest-height, resulting in a flattering view of the product.
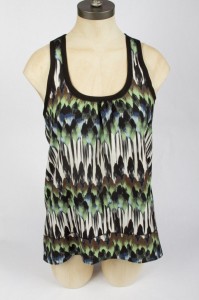
The camera was positioned lower than chest level in this image,
which flattens the appearance of the product
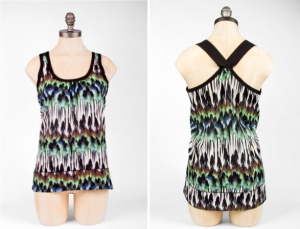
Shooting at chest-height provides an appealing view of the product.
Using a telephoto zoom lens to capture your images can help to minimize distortion and provide you with the flexibility to move closer to smaller objects and move farther away from larger objects. Make sure that your studio shooting space is large enough to accommodate your camera and tripod, two studio lights and umbrellas spaced evenly apart on either side of the product, and backdrop.
Read here for more ideas about lighting equipment and arranging a studio space.
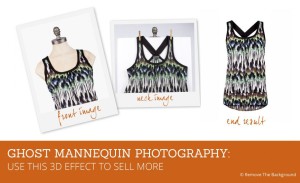
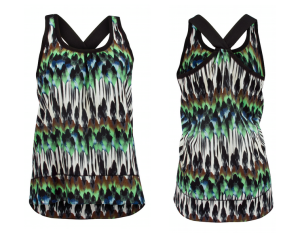
To create a 3D image with the ghost mannequin technique, you will first need to capture a front and back view of your product being worn by your mannequin or model. After that, you should style and hang your product on a piece of white foam board and photograph both the front and back views again; these foam board shots will allow you to include the inner areas of the garment once you combine the images together, as shown below
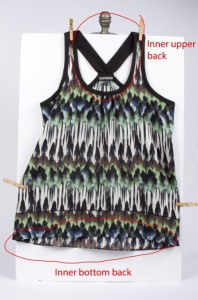
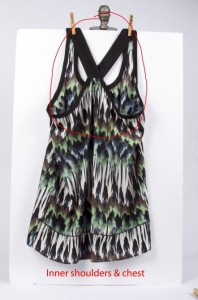
Make sure to use the exact same lighting conditions for both the mannequin/model shots and the foam board shots. The easiest way to do this is to mark the mannequin’s/model’s location and make sure to place the foam board in exactly the same spot and at the same height.
3. Post-Processing Images
After you have captured the necessary views to create the ghost mannequin effect in your final edited images, you will need to send the images to an outsourced editing company with instructions or catalog the images yourself and open them in Adobe Photoshop to make your own edits. Outsourcing this work may save your company a great deal of time and frustration in the long run, but you may choose to make the edits yourself because of budget constraints.
Stay tuned to future posts in our blog to discover how to process 3D images or ghost mannequin effect with Remove The Background.
You will see how simple the process is and how fast you will get your images done, in 24 hours or less, including this amazing 3D effect that will improve your product presentation and help you increase sales on your online store!