Ghost mannequin — or invisible mannequin photography — is commonly used by brands and retailers to give their products a 3D, “hollow man”. In this tutorial, you will learn how these mannequins work to achieve this look.

Invisible mannequin photography is particularly useful for things like blazers, jeans, jackets and shirts to help customers more easily imagine themselves wearing the garments. Many brands and retailers across the world prefer to shoot all of their clothes using this style to maintain consistency.
Usually it’s impossible to create this look without a great deal of post-processing or clever image compositing techniques — but, by using a special ghost mannequin you can bring the inside of your clothes to life without the need for Photoshop.
This blog was written by Styleshoots, a European-based technology company that builds innovative imaging solutions for the world of fashion e-commerce. Their ‘all-in-one’ content creation machines are used by hundreds of brands around the world to take millions of pro-quality product photos every year.
For more articles on ghost photography click here and to purchase a ghost mannequin, Mannequin Madness has a wide variety of choices here.
The equipment you need to take invisible mannequin shots of your clothes
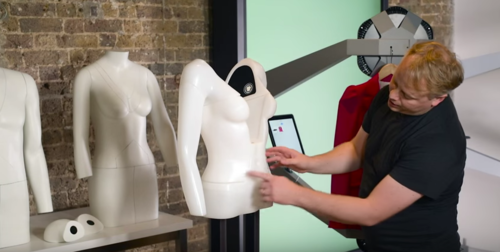
- Ghost mannequin – Any modular mannequin – with removable chest and arms – can be used for getting invisible product shots by removing pieces individually
- Camera – Any camera will suffice but a Canon EOS 5D Mk III is recommended as the industry-standard for professional product photography
- Studio lighting – A source of continuous cool LED lamps are recommended for lighting to ensure exposure, shadows and contrast are kept consistent
- Your garments – Clothes that work particularly well for this type of photography include shirts, jackets, coats, blazers, and dresses
- Styling tools – Clips, pins, tape, tissue paper and more are used to help the clothes fit more tightly
Choosing the right mannequin for your clothes
To begin, choosing a mannequin that fits the product is important as ghost mannequins come in a range of sizes and styles. If you are based in the United States or Canada, see the full range of invisible mannequins for product photography here. If you are based in Europe, see a full range of invisible mannequins for product photography here.
If the shape isn’t right, your garments won’t fit as well as they could. So it’s useful to have a variety of different mannequins on hand to shoot with. However, we understand that not everyone can have a range of ghost mannequins at their disposal – so styling pins and clips are important.
Once you have chosen the right mannequin, stack up your clothes in a logical order of shooting — grouping together the ones that will fit without having to keep changing mannequins and pieces. You will save yourself tons of effort and allow more time for styling.
First, select which modules of the mannequin you would like to remove. Using a blazer for this example, the lining is a very important feature to showcase on your eCommerce store — so, in this instance, we will remove the ‘V’ chest piece.
Carefully remove the chest module. It’s also a good idea, depending on the length of your garment, to remove the pelvis area of the ghost mannequin. By doing so, you will be able to achieve a subtle ‘flared out’ effect showing the lining at the bottom of your blazer (or shirt, dress — you name it!).

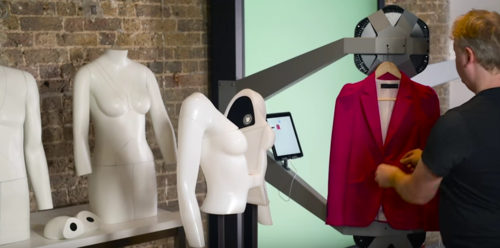
Next, starting with the sleeves, gently dress the mannequin with the blazer (or any apparel of your choice for that matter).
Fix the shoulders and make sure the seams line up with the mannequin’s shoulders. Take the time to ensure that there is no noticeable stretching of the fabric.
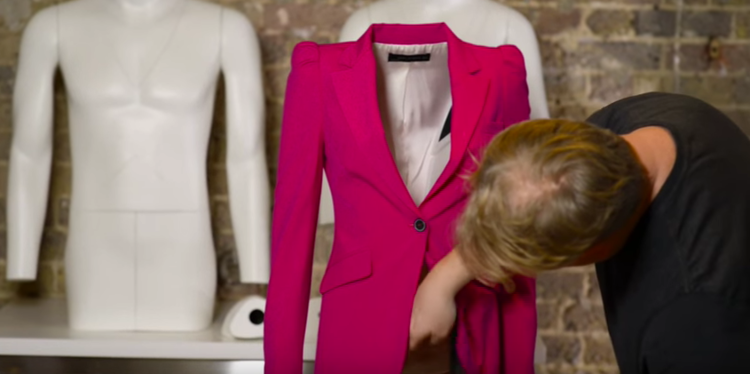
Now you will see the lining is completely exposed, as if an invisible person were wearing it.
For any areas where the garment doesn’t fit perfectly, use a combination of styling pins on the back panel to tighten things up. Tissue paper is also incredibly useful to help ‘bulk’ out areas you’d like to give emphasis to.
Spend some time to style the blazer, making sure it fits on the mannequin symmetrically and that there are no noticeable creases.
Not sure what equipment is best to help with styling? See styling toolkit essentials.
Set up your lighting and exposure so it highlights the key features of the blazer without drowning out any colors — you can learn more about lighting and exposure here.
Next, focus your lens and take a selection of shots that cover not only the blazer as a whole, but also zoom in to the lining and stitching. Get creative — you know what your customers are looking for.
- Use styling pins behind on the back and below the armpit area if your clothes are too big for your selected mannequin to achieve a more sleek, fitted look
- Use crêpe paper to ‘stuff’ areas that need to be filled out or given emphasis
- Sort your clothes into ‘loads’ based on how they fit each mannequin to save time swapping and changing pieces