Ready to get your window display ready for Halloween? Here are a couple of tips on how you can dress up your Halloween window display to inspire, captivate, and encourage sales!
A Few Details: What Is A Window Display?
To us, we believe a window display is a channel to communicate your brand story. For new customers, window display advertising is often the first point of contact they will have with your business. For returning visitors and customers, your retail display is a great way to help strengthen your relationship with your business and encourage returning business.
Celebrating Halloween: Window Display Ideas
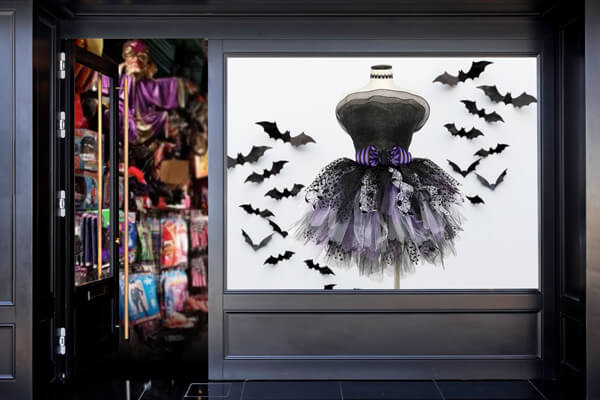
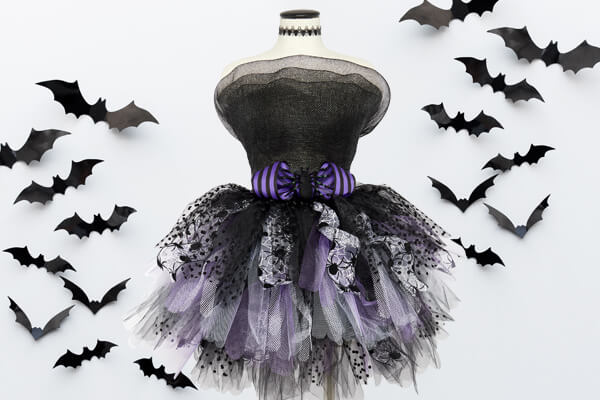
If you’re looking to add a spook-tacular layer for the Halloween and Fall season, we’ve got you covered. We’ve curated our wide variety of craft supplies and essentials with high quality materials able to withstand natural elements like sun exposure, wind, and more. Here, we’ve used deco mesh, ribbon, and our Mannequin Madness dress form!
Quality Window Display Supplies For Halloween
- Deco Mesh | Deco mesh is a must-have among visual merchandisers and installation artists. It is available in a variety of colors and styles for every season, easy to work with, and keeps its structure.
- Ribbon | Ribbons are a great way to accent and embellish for a big impact. They’re especially useful because they are available in a variety of materials, textures, and patterns.
The Key To An Inspiring & Approachable Display: Balance
When it comes to dressing a window display for Halloween, the possibilities are endless! We’ve found that retail display advertising can feature large scale and extravagant creations. While this can inspire your customers, it does have the potential to overwhelm them as well. To help keep your display and brand voice approachable, we recommend adding small elements to your display that can be easily made at home.
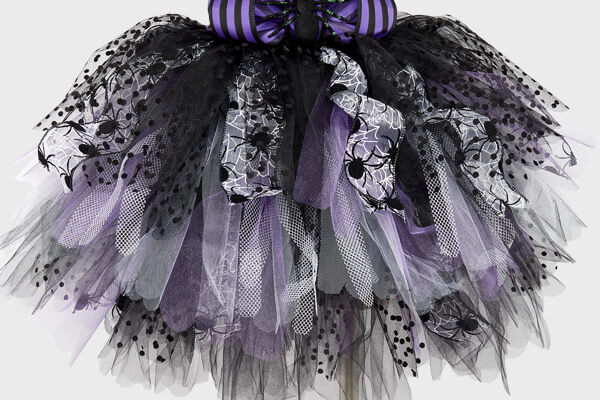
With our Spider Queen-inspired Halloween display, we got extra creative with our multi-layered tulle skirt and custom-made deco mesh bodice. To help keep the look accessible, we included simple ribbon accessories. This way, our customers can still be inspired to create items on a smaller scale.
How We Made Our 3-Tier Tulle & Ribbon Skirt
Our skirt is made up of three layers of tulle and ribbon. To get the multi-layered effect, we positioned the waistband of each layer at 3 points of our mannequin’s waist. Here’s how we constructed each of our skirt layers!
You’ll Need
- Black Velvet Ribbon (We love using the soft, plush texture of our narrow velvet ribbon to help hold the ribbon and tulle body of our skirt layers in place. Thin ribbon, string, or any cord can be used as great waistband alternatives.)
- Black Spider Web Flocked Wired Ribbon
- Black Polka Dot Tulle
- Black Tulle
- White Honeycomb Tulle
- White Tulle
- Purple Shimmer Tulle
How To Create Each Skirt Layer Out Of Tulle & Ribbon
Your First Tulle Layer
1.) Begin by creating the waistband of your skirt. Using your velvet ribbon, wrap one end above your mannequin’s hip level and cut to size and pin on your mannequin appropriately.
2.) Next, using your rolls of black and black polka dot tulle, trim them down to 3” wide strips. To do this, lay the roll flat, trim 3” wide strips of tulle, and finish each end with a rounded detail. We liked the look of a shorter skirt, so we kept the length of our tulle to be 26”-34” long. Repeat with the black polka dot tulle.
Note: For this layer, we created 44 tulle strips. This total amount is extremely flexible, depending on your form, it may be more or less.
- From our black tulle roll, we made 40, 3” x 26”-34” strips.
- From our black polka dot tulle roll, we made 4, 3” x -26-34” strips.
3.) After your waistband and tulle strips are created, begin to form the first layer of your skirt using a simple Lark’s Head knot technique. Taking a strip of tulle, fold it in half and place the loop over the velvet waistband. Bring the loop around the back and pull your two loose tulle ends through the loop to tighten. Repeat this knot with each tulle strip until your waistband is fully covered.
Your Second Layer
1.) Use your velvet ribbon to create a second waistband, positioned at mid-hip level.
2.) Next, using your rolls of black, white, white honeycomb, and purple shimmer tulle, trim them down to 1-3” wide strips. To do this, lay the roll flat, trim strips of tulle, and finish each end with a rounded detail. For our second layer, we kept the length of our tulle to be 24”-28” long.
Note: For this layer, we created 49 tulle strips. This total amount is extremely flexible, depending on your form, it may be more or less.
- From our black tulle roll, we made 14, 3” x 24”-28” strips.
- From our white tulle roll, we made 14, 3” x 24-28” strips.
- From our white honeycomb roll, we made 5, 1” x 24-28” strips.
- From our purple shimmer roll, we made 7, 3” x 24-28” strips.
3.) To help define your skirt shape and create texture, we encourage playing with the tulle strips and grouping them together by color and finish. Here’s how we grouped a couple of our tulle layers.
- One group consisted of the black and white tulle strips.
- Another group consisted of the solid white and white honeycomb strips.
4.) After your tulle strips and tulle groups have been created, begin to form the second layer of your skirt with a Lark’s Head knot, alternating each tulle group and strips of shimmer tulle throughout the waistband.
Your Third Layer
1.) Use your velvet ribbon to create a third waistband, positioned at your dress form’s waist.
2.) Next, using your black tulle, black polka dot tulle and spider web ribbon, create strips that range from 13-24” long. Finish each end with a rounded detail.
Note: For this layer, we created 43 tulle strips and 10 ribbon strips. This total amount is extremely flexible, depending on your form, it may be more or less.
- From our black tulle roll, we made 33, 3” x 22” strips.
- From our black polka dot tulle roll, we made 10, 3” x 22” strips.
- From our spider web roll, we made 10, 2-1/2” x 13” strips.
3.) Once your tulle and ribbon strips have been made, form your final skirt layer using a Lark’s Head knot, alternating strips of tulle and ribbon throughout the waistband.
Here’s How We Made Our Ribbon Necklace & Belt Accessories
For A Spider Queen Belt, You’ll Need
- Black & Purple Stripe Wired Ribbon
- Glue Gun & Glue Sticks
- Your Favorite Spider Accent
- Tape Measure
- Scissors
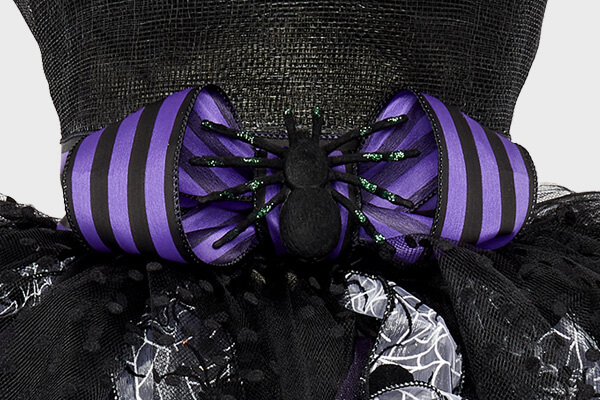
How To Make A Boo-tiful Spider Belt
1.) Use a tape measure to get the waist circumference of your mannequin and add 2”. This will be the length of your ribbon belt body.
2.) Take your scissors and trim your striped ribbon accordingly. Once trimmed, wrap the ribbon around the mannequin’s waist and hot glue the ends together at the back of your form.
3.) After your belt body is secure, use the rest of your wired ribbon to create your favorite bow shape. Once finished, hot glue it to the front of your belt.
4.) Finally, add your favorite spider accessory to the bow center.
For The Spider Choker Accent, You’ll Need
- Laser Cut Black Spider Ribbon
- 5/8” Purple Satin Ribbon
- Glue Gun & Glue Sticks
- Tape Measure
- Scissors
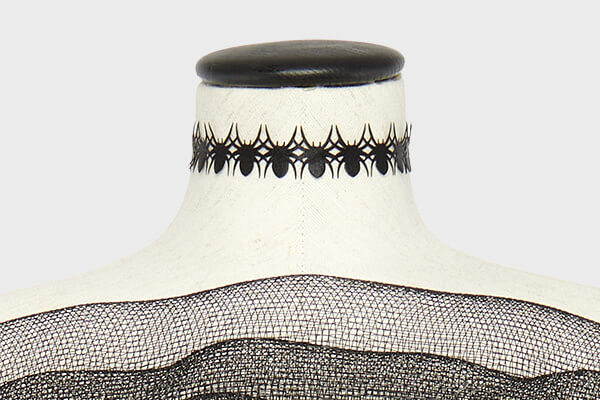
Here’s How To Make Your Own Simple Spider Choker
1.) Use a tape measure to get the neck circumference of your mannequin and subtract 1-½” from your final measurement.
2.) Take your scissors and trim your spider ribbon accordingly. This will be the main body of your choker.
3.) Next, trim two 13” strips from your purple satin ribbon. These two strips will be your choker’s end ties.
4.) Use hot glue to attach one satin ribbon end tie to an end of your spider ribbon. Repeat with the second satin ribbon.
5.) Wrap the spider ribbon around the neck of your form with the satin ribbon ends at the back. Tie a simple bow to keep the choker in place.
Retail Store Display Supplies At Paper Mart
Seasonal window displays can be made from the most unexpected materials. If you’re looking for window display supplies, check out our wide variety of craft supplies here!For Business
Credit :https://blog.papermart.com/small-business/retail-window-display-supplies-halloween/