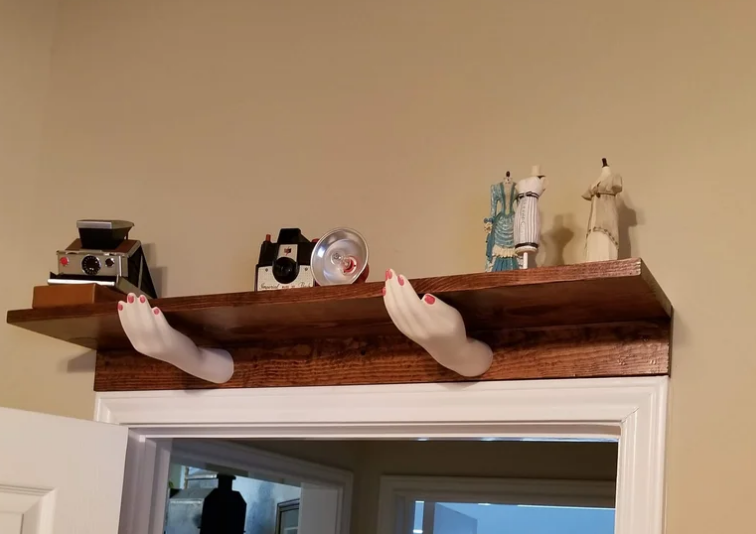
People use mannequins for DIY projects because they provide a versatile and creative canvas for artistic expression, upcycling, and home décor. For amazing and innovative examples of how mannequins are repurposed into functional and decorative decor this page on our website here.
We love it when people use secondhand mannequins for these projects like the ones we sell on our website because it aligns with sustainable crafting, reducing waste while giving new life to forgotten objects.
This tutorial below for making a shelf using mannequin hands is reprinted from the Instructables website. We have not tested the tutorial, but it seems pretty accurate based on projects we have made in the past.
Not long ago I happened across a store that was going out of business and had a lot of fixtures for sale. Included in the sale was quite a few mannequins, and a pile of miscellaneous mannequin parts. To make a long story short, I bought a few arms and a couple of legs with the idea that I would eventually come up with a purpose for them. It wasn’t long before I came up with the idea of the “Hand-y” shelf.
Mannequin parts can be expensive, but I happened along at the right time and bought these parts for $1.00 apiece!
Supplies
The supplies I used for this project was:
– two mannequin hands
– a length of 1×8 oak for the shelf
– a length of 1×3 oak for mounting the shelf
– wood glue
– various screws for assembling & mounting
Step 1: Prepare the Hands

The hands I purchased came in the form of entire arms, so the first thing I did was to cut off the portion of the arms that I did not need. Inside the cut off hand, I made a wooden plug that I glued into the cavity, and reinforced it with 3 screws (you can see this in the first photo). Note: This first photo is not of the actual hand I used in this project (I used it in another project), but I included it to give you a visual of this step of the process. The use of a wood plug provides a way of attaching the hand to the mounting board of the shelf.
Before going further, I spray painted the hands a flesh color, then painted the fingernails. Actually, that’s not true, I talked my wife into painting the fingernails…..
Step 2: Cut the Lumber and Mount the Hands

While the painted hands were drying, I cut the lumber to the length I needed. Next, I glued and screwed the mounting board to the shelf, then attached the hands to the mounting board by using screws inserted from the back. Because there are no brackets used on this shelf, be sure to use glue and screws (not nails) to attach the shelf to the mounting board.
Once I was satisfied with the fit, I removed the hands and stained & varnished the wood. After the finish was cured, I reattached the hands.
Step 3: Mounting the Shelf
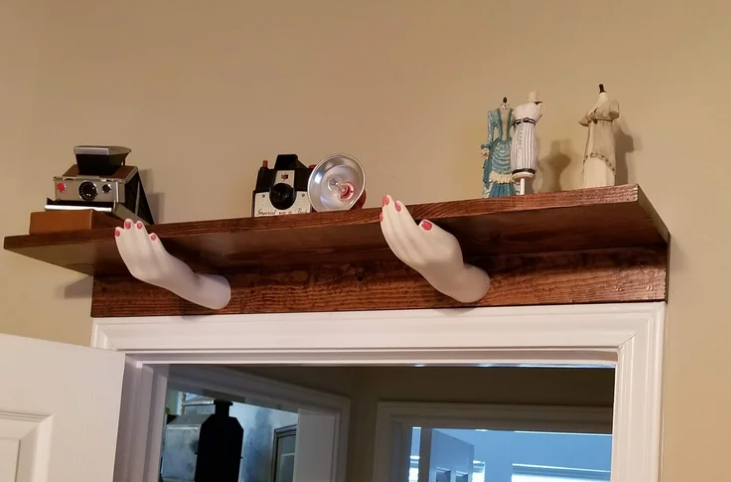
The shelf is mounted using screws that go through the mounting board and into studs in the wall. Since I placed this shelf over a doorway, finding studs was easy (I used the studs that run parallel with each side of the doorway).
This is what I did with the mannequin hands, I haven’t yet decided what to do with the legs, but I’m thinking, I’m thinking…..
For more amazing DIY tutorials, not just mannequin ones check out the Instructables website. Since its founding, Instructables has grown into an amazing community of curious doers from around the world and is home to hundreds of thousands of projects.
In 2011 Instructables became a part of Autodesk, which believes in empowering innovators everywhere to take the problems of today and turn them into something amazing. By sharing what we make, we are able to connect across boundaries and prepare ourselves with the skills needed to adapt to the future’s challenges. Every day we continue to be amazed by the imagination, curiosity, and simple awesomeness of everyone who shares their creations with us on Instructables.
Visit our website to shop for mannequins and dress forms, rent display pieces, or recycle your old mannequins.