
The Instructables website is an amazing community of curious doers from around the world and is home to hundreds of thousands of DIY projects. We frequently repost projects that involve mannequins. Disclaimer : the author of the post below lists resources on Amazon where you can purchase the products and she gets a commission. We have removed her referral for mannequins and replaced it with ours.
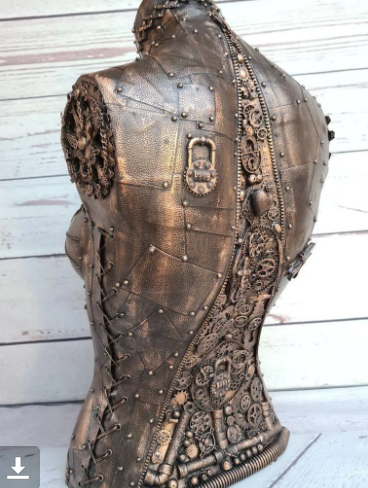
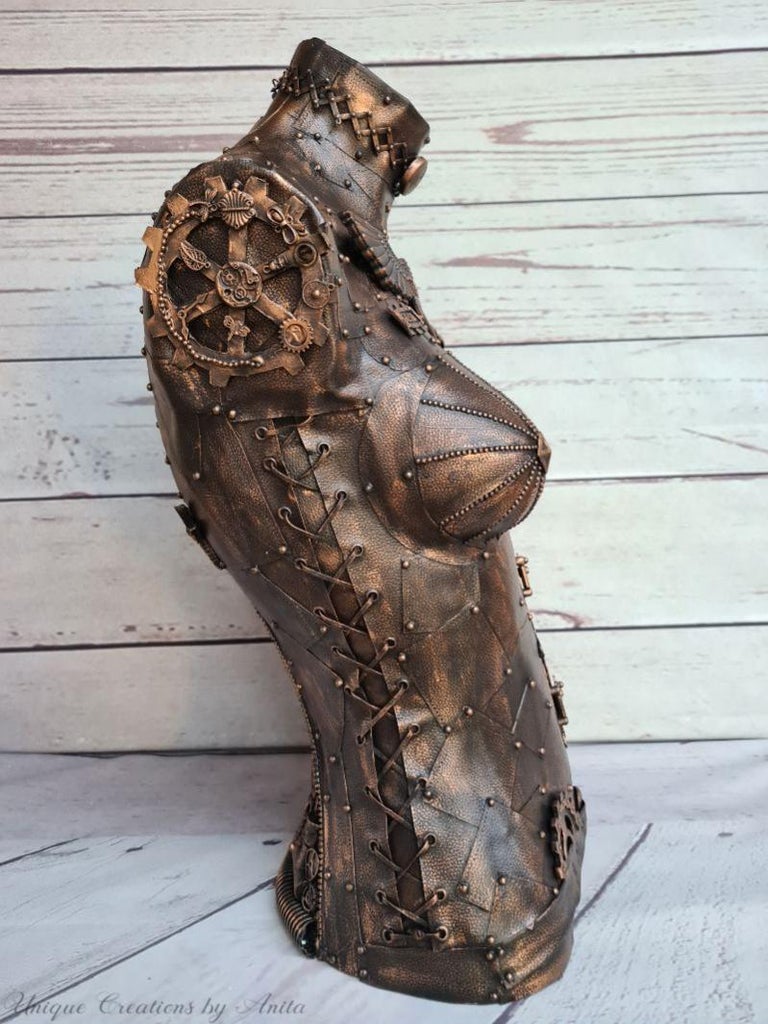
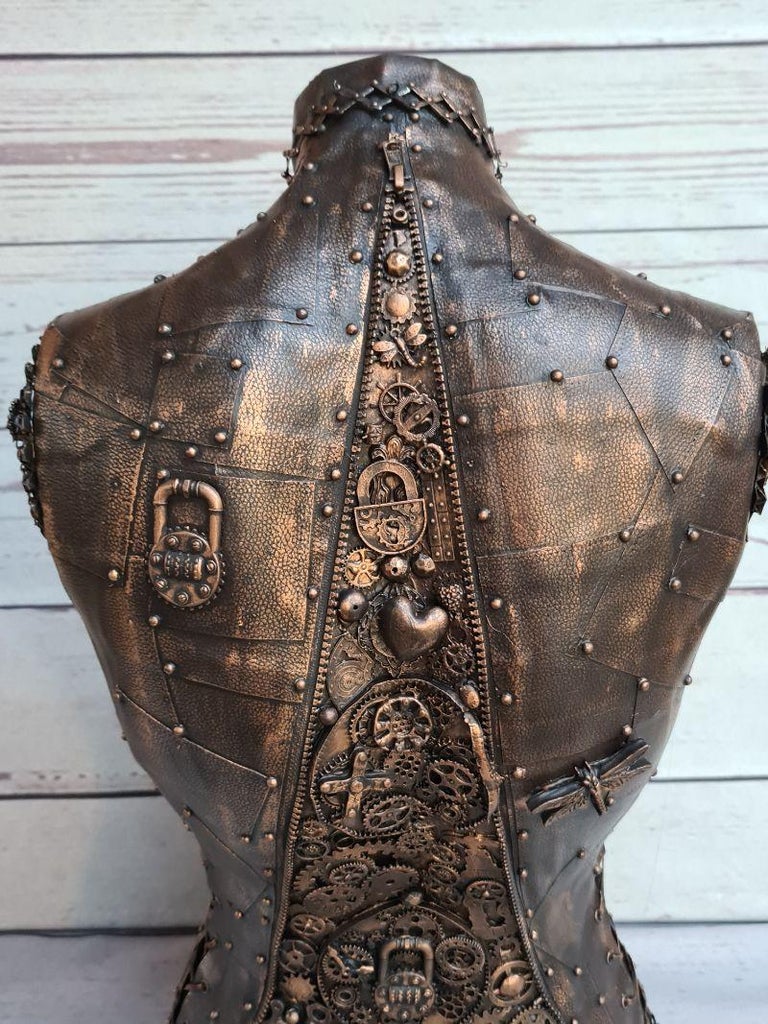
I have seen so many mannequins that have been decorated for home decor, but I was never lucky enough to find one. Until now, I found this one in a charity shop and snapped it up. Because I am steampunk mad at the moment it seemed fitting to give this sexy mannequin a steampunk makeover. I wanted the mannequin to look like patchwork metal in the front. And for the back, I wanted it to look like she had been unzipped to expose her inner mechanics.
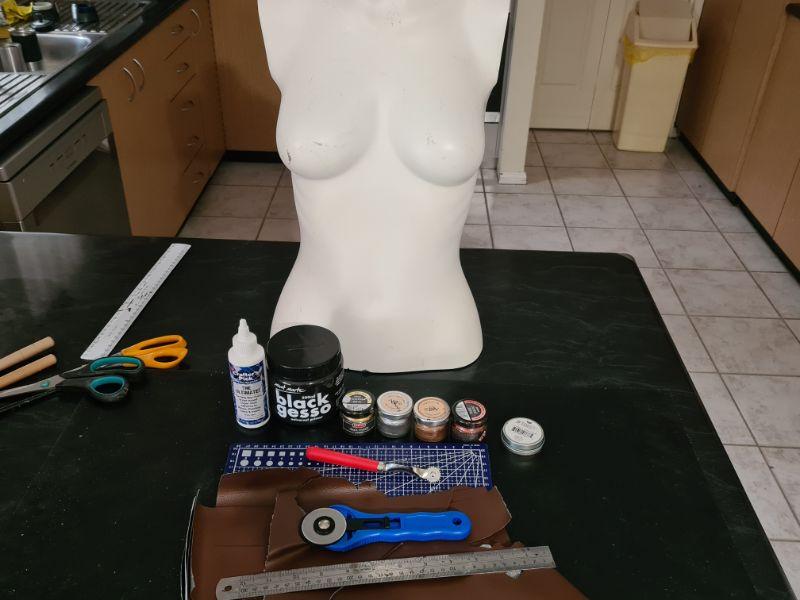
Supplies
Affiliate links, this means I earn a small commission from Amazon for items purchased at no extra cost to you. Disclosure
Used mannequins, torsos and dress forms at MannequinMadness.com
Black gesso – https://amzn.to/2J3xpdi
steampunk silicon moulds – https://amzn.to/34LqspQ
Gear moulds – https://amzn.to/37KoojJ
Faux Leather – https://amzn.to/2HGS1b5
Leather lace – https://amzn.to/3dZbQWG
Cutting Mat – https://amzn.to/3oxwWjJ
Cutting wheel – https://amzn.to/3oxJKGU
Tracing wheel – https://amzn.to/34x8GGD
Bronze wax paste – https://amzn.to/2TvqGL8
Steampunk gears – https://amzn.to/35Ageb6
Steampunk charms – https://amzn.to/2HuChIg
Step 1: Prepare Your Mannequin
This mannequin is plastic so this tutorial may not work on other surfaces like fabric or foam. Clean the surface of the mannequin to remove all the dust and dirt so the glue will stick better. If your mannequin is hollow it is also a good idea to add a bag of sand inside to prevent it from falling over while decorating it.
Step 2: Cut the Leather


To cut the leather I used a cutting matt and cutting wheel. I wanted all the leather to be cut into shapes and not just randomly because you will have a nicer finish. This step does take some time to complete. An alternative to cutting by hand you can use a Cricut or silhouette cameo cutting machine to cut the shapes.
Step 3: Add Sticking Holes

To add the holes you can use a tracing wheel. Using a ruler, run the tracing wheel around all the edges. This will give the appearance of stitching around the edges.
Step 4: What Glue Works

I tried a few different types of glue to do this project. A hot glue gun worked for the edges but nothing else. It left lumps under the leather that will show through later which will spoil the look. Mod podge took forever to dry and had to be washed off. Tacky glue did work but there was some waiting time. I also tried E6000 and similar but it ate into the faux leather.
In the end, I used Crafter’s pick “The ultimate”. This glue is more expensive than all the others but it holds well enough to continue working all the time. I did have to go back at times and push the leather down on the curves.
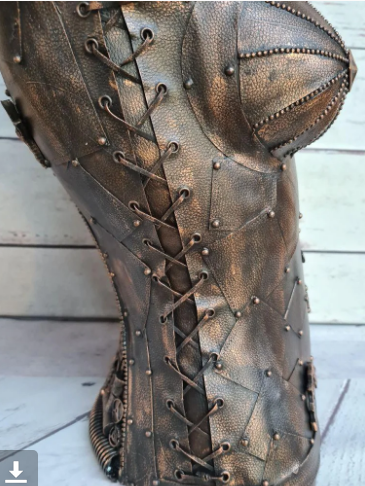
Step 5: Making the Side Panels
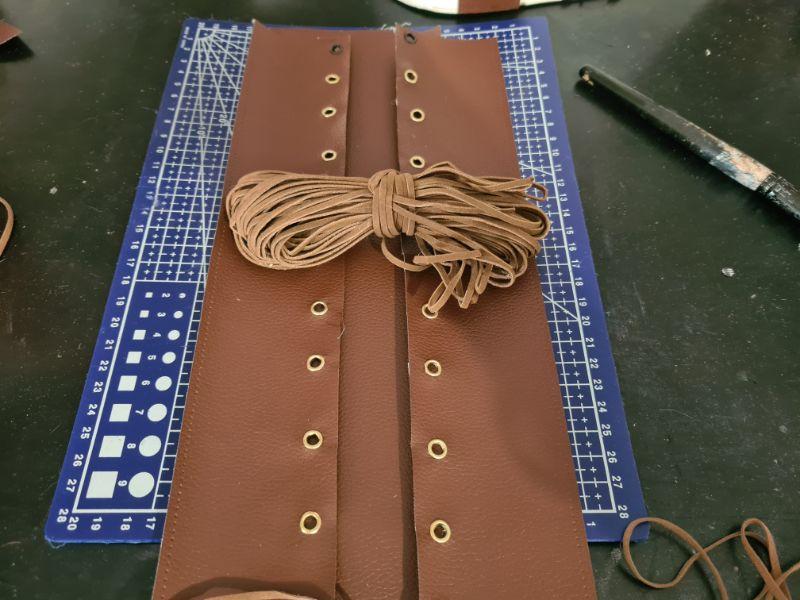

Cut 2 pieces of leather the length of the mannequin from under the arm down to the bottom. Cut them thick enough to cover the sides, then cut one in half. Glue the half pieces down on to the bigger piece like the image. I used a cheap shoe eyelet punch to add the grommets for the leather cord.
Step 6: Making the Belt

The belt was made in the same way, using a recycled belt buckle.
Step 7: Glue the Faux Leather to the Mannequin


Start by adding the section in the middle. I had to cut mine to shape because of the curves on the mannequin. If you don’t cut it to shape it will cause a bulge under the next layer. Which will spoil the look. When glueing the leather you have to cover the whole surface with glue to make sure it sticks down flat. Next, I started layering and overlapping the patches on the front.
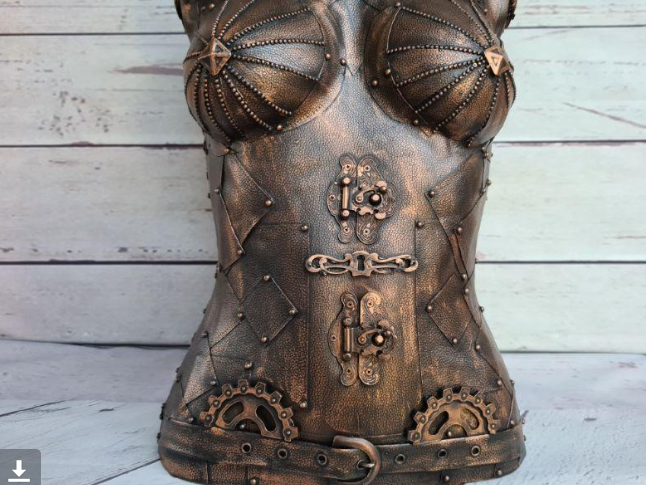
Step 8: Covering the Boobs


Because of the shape, the boobs were a bit harder to cover. I cut a circle of leather big enough to cover the boobs first. You can then cut them into a Pizza shape and glue them in place, I did have to cut some even smaller.
Step 9: Add the Lace Ups


Next, glue the lace-ups to the mannequin, then add more patches to cover up the seams. If your mannequin is curvy like mine you will have to add slits in the leather so they glue flat to the plastic. Do this to both sides. Don’t worry too much about the glue residue the gesso will cover that later. To make the outfit look like a uniform, I tried to add some patches to look like lapels. You can keep adding overlapping patches until the surface is all covered.
Step 10: Adding the Zipper
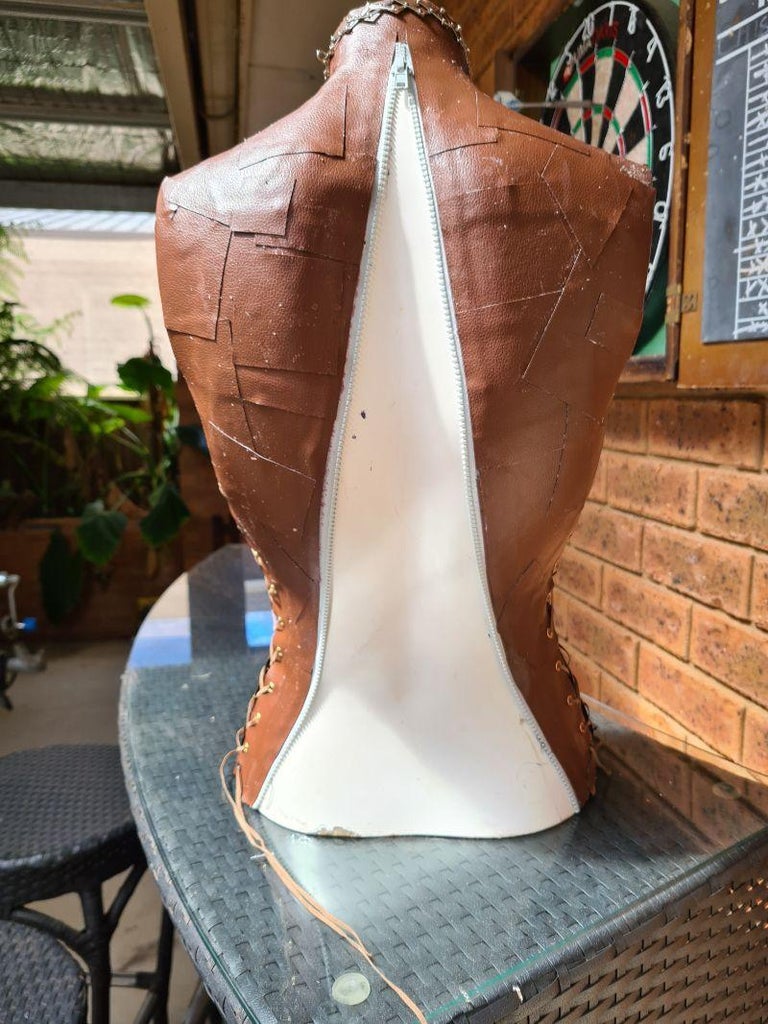
The large zipper down the back was recycled from an old mattress cover. I used hot glue to stick that down and added more patches to cover it up.
Step 11: Adding the Studs


To make steampunk look cool you want to add some studs to the corners of each patch, this is to resemble rivets. There was no quick and easy way to do this other than gluing them on one by one.
Step 12: Fill in the Gaps


To fill in the gaps around the boobs I use some self-adhesive studs. I did have to glue them on because they did not stick well. This was the mannequin with all the studs added.Add TipAsk QuestionCommentDownload
Step 13: Making the Embellishments

My mannequin had a curve in her back, so I knew when I added the charms they would not sit flat. This will cause an issue if bumped because they will break or fall off. To prevent this from happening I made some charms using epoxy resin and moulds. My steampunk ones are among these, I make them all in one go.Add TipAsk QuestionCommentDownload
Step 14: Adding the Resin Charms

The reason resin charms are so handy is that they can be moulded into the curves, even after they have set. You warm them up with a hairdryer and they become softer, so they can bend without breaking.Add TipAsk QuestionCommentDownload
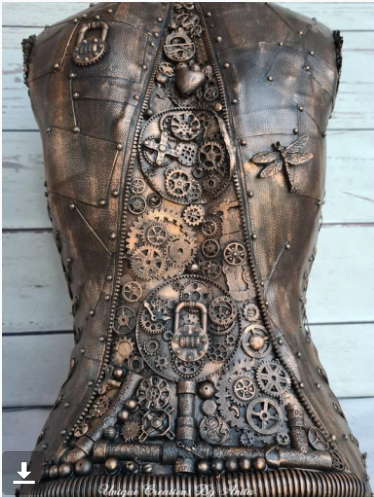
Step 15: Adding the Steampunk Charms

The metal steampunk charms and bits and bobs I used were all attached using hot glue. Once you have covered the base you can start layering some of the charms. To fill the gaps I used beads from recycled jewellery.Add TipAsk QuestionCommentDownload
Step 16: Adding Feature Charms
To make a feature of the front I added some more upmarket charms.Add TipAsk QuestionCommentDownload
Step 17: Paint the Mannequin

Next, you paint everything black. I always use black gesso because it is a primer and has better coverage than acrylic paint.Add TipAsk QuestionCommentDownload
Step 18: Adding the Metallic Wax Paste


This bronze metallic wax paste is what makes the magic happen. The best way to apply the wax is with the tip of your finger. You only touch the wax with your finger, try not to scoop. Start by rubbing your finger very lightly over all the raised edges, the idea is not to cover all the black. You want the raised edges to be darker than the rest. This may be awkward at first but once you get the hang of it, it will take no time at all. I did this in less than 10 minutes.Add TipAsk QuestionCommentDownload
Step 19: Highlighting the Leather


You do the same process for the leather just press down even lighter. The only way I can describe it is as if you are tickling someone. When you go lightly it only skims the surface so you get this effect.Add TipAsk QuestionCommentDownload
Step 20:

Do the same with the back, but in the smaller gaps, you can use a small paintbrush to add some wax. This is also a very light coat.Add TipAsk QuestionCommentDownload
Step 21: Making the Gears for the Arms

I printed out the gear that I wanted onto paper and used it as a template. I glue it to some thick cardboard and cut out the shape with a craft knife.Add TipAsk QuestionCommentDownload
Step 22: Decorate the Gear

I glued all sorts of random junk onto them as you can see from the image. I did add some texture paste to the gear so it looked more rustic. They were then painted with the gesso and highlighted with the bronze wax paste. The great thing about this technique is you can be messy and it still looks great once painted.Add TipAsk QuestionCommentDownload
Step 23: Seal the Finish

The gold wax paste will have to dry for 12 hours before you can seal it. If you don’t seal the wax it will turn slightly dull over time. I added 2 thin coats of clear acrylic spray as a sealer. This will make the colours pop even more.Add TipAsk QuestionCommentDownload
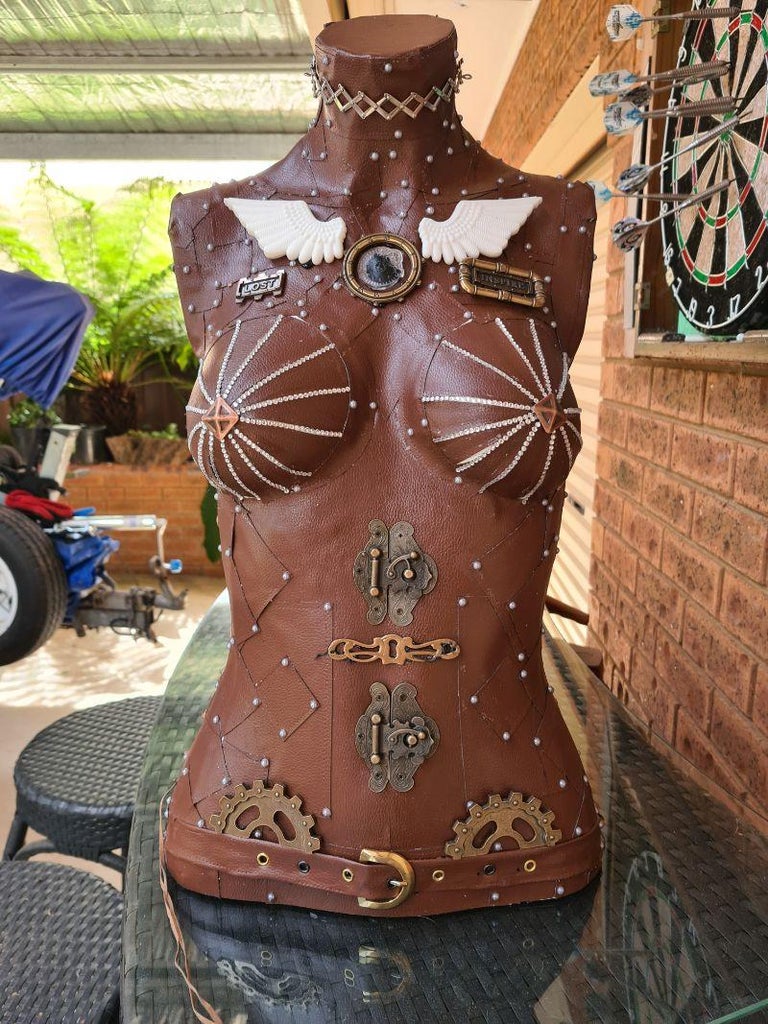
Step 24: Close Up of the Finished Mannequin
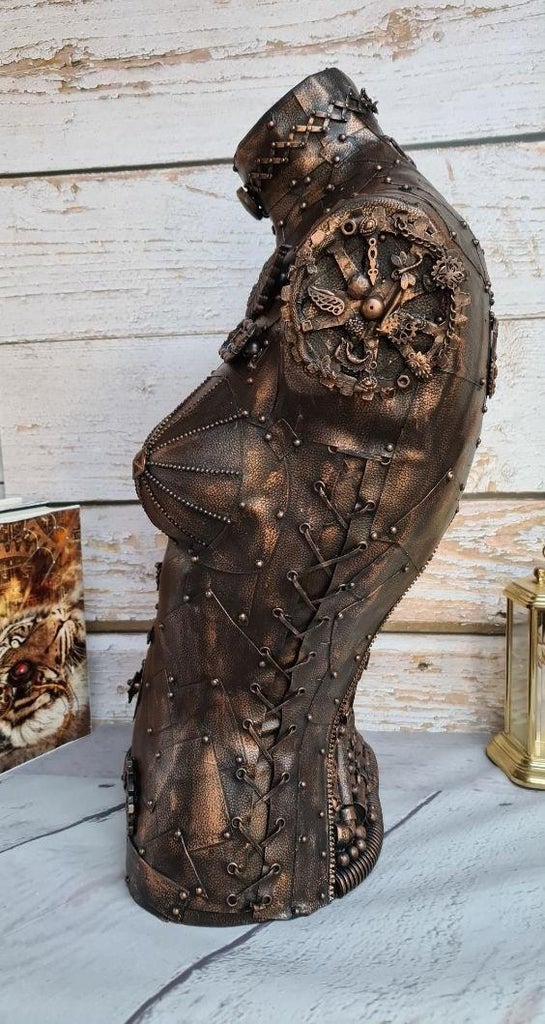
3 More ImagesAdd TipAsk QuestionCommentDownload
Step 25: More Projects You May Like
I built this wine barrel table and personalized it with a family logo which was sealed in resin.Add TipAsk QuestionCommentDownload
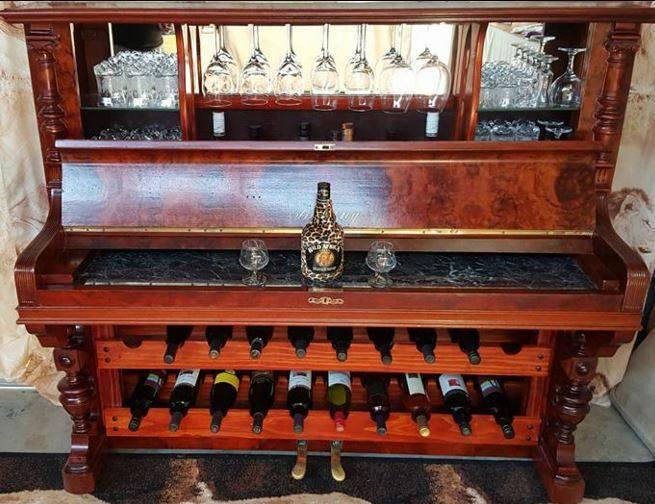
Step 26: Repurposed Piano
2 More Images
I repurpose this old piano into a bar/drinks cabinet. To see more great unique projects check out my website Unique creations By Anita
Source :https://www.instructables.com/How-to-Give-a-Mannequin-a-Steampunk-Makeover/